
C++ Remote Development on Unix using Netbeans on Windows
My recent work involves C++ development on a Linux server remotely, using a terminal. Usual practices involve programming in a terminal, using a good mix of linux commands knowledge and a handy text editor like emacs or vim or nano etc. Of course, the learning curve is steep: One must get accustomed to the text editor, learn a handful of shortcuts and of course configuring numerous plugins for code navigation, refactoring and other development practices.
Being a Windows guy till now, I’ve spent a good deal of time trying to figure out the best mix I could use to develop remotely from my laptop. There are numerous choices one can follow, such as using just PuTTY or employing an IDE such as Netbeans or Eclipse. My final configuration involves Netbeans, Mercurial and PuTTY for running and debugging my project remotely. In this post, I enumerate the various issues I came along and how I tackled them.
PuTTY, Keys, Tunnels and Windows scripts
PuTTY is the de facto SSH client to use on Windows. Even only with PuTTY, you can use a terminal text editor to edit your source code, and then build and execute your program. But what about customizing PuTTY and making it more comfortable?
SSH keys for automatic login
First of all, you can use SSH keys in order not to input your password each time you connect to your server. Open up PuTTYgen, click Generate, move your mouse a bit and you’ve just made your private and public SSH-2 (RSA) keys! Save them (by using the Save public key and Save private key buttons) and copy the generated public key (highlighted by PuTTYgen). Open then PuTTY and execute:
mkdir ~/.ssh
vi ~/.ssh/authorized_keys
# Paste here the public key given by PuTTY as a seperate line in the file.
chmod 600 ~/.ssh/authorized_keys
After that, you can open PuTTY, and configure you session to use the generated private key you’ve stored on your disk. Do this under the option Connection > SSH > Auth > Private key file for authentication. Don’t forget also to supply your username under Connection > Data, else it will ask for your username every time. Now you’re all set, save your session and when you open it again, you’ll be automatically logged into your remote server.
Tunnel for reaching an internal server
In my case, the server I develop on is accessible only through the organization’s inside network. As such, I cannot connect immediately to the server. I must first connect to a gateway server and then SSH again to the internal server. When working remotely, this becomes cumbersome. There are two solutions, either you must use a VPN connection to get an internal IP address on your laptop or use SSH tunnels. The latter option is more efficient, as a VPN connection incurs more overhead than an SSH tunnel. Now, we can open up a tunnel going from the internal server, through the gateway server and ending up on Windows, all that through PuTTY.
To create such a tunnel, open PuTTY and load the session you use to connect to the gateway server. Under Connection > SSH > Tunnels, we can create the tunnel we need. Add a source port that will be a port on your laptop (e.g. 26) and add as the destination internalserver@example.com:22, substituting accordingly. Save your modified session and open it. You’ll have your usual shell of the gateway server, but if you right-click PuTTY’s title icon and then Event Log, you’ll see that it has created a tunnel between the local port 26 and the internal server’s 22 port.
Now, you can open up another PuTTY concurrently and connect to localhost:26 and you get your internal server’s shell! But, you’re left hanging with two opened PuTTY windows. One for the gateway server, which you don’t use, and one for your real development. How can we open up the tunnel in the background? Read up.
Background Tunnel with Windows scripts
PuTTY also offers a handy command line version, plink.exe. You can use this to automatically open up a saved session in the command line. We can use this to open our gateway session in the background and the tunnel will also be up and running in the background.
First write a simple .bat file with the following command:
"C:\Program Files\PuTTY\plink.exe" sessionName -N
Then you can write the following .vbs scipt file to load the .bat in the background:
Set WinScriptHost = CreateObject("WScript.Shell")
WinScriptHost.Run Chr(34) & "path to .bat file" & Chr(34), 0
Set WinScriptHost = Nothing
Now, when you click your .vbs script, you get a background process that has loaded up your PuTTY session. If you want to kill it, you can do it by ending the plink.exe process in the Task Manager or making another .bat script to kill the process.
Sending keys to PuTTY
Don’t underestimate Window’s scripts. They may be very cumbersome (in contrast to bash scripts), but they are also quite useful. If you want to make a script to automate the process of writing a command to PuTTY, here’s a useful .vbs script.
Set WshShell = WScript.CreateObject("WScript.Shell")
WshShell.AppActivate Wscript.Arguments(0)
WshShell.SendKeys Wscript.Arguments(1)
You can call this .vbs through command line and provide as first argument the Window title of PuTTY (usually the session name) and as a second command the keys you wish to enter e.g. “top{ENTER}”.
Netbeans
Both Netbeans and Eclipse are quite popular and used for many programming languages. But in the case of remote C++ development, Netbeans is more natural. It is able to connect to your server through SSH and recognizes your remote development tools (e.g. the compiler, the debugger and relevant header files). As such, it’s able to parse your code and provide code assistance and refactoring without a lot of frustration. Just think of the compiler and libraries header files you can include remotely. Click here to read Netbean’s relevant tutorial.
Netbean’s disadvantage is that it needs your project’s files locally to parse them (in contrast to Eclipse’s Remote System Explorer which integrates with your project). You’re given two solutions: either map a network drive to your files through SSH (for free solutions consider SFTP Net Drive and Dokan), or copy files locally and Netbeans will upload them upon building and running them on the server. If you’re away from the server, avoid the first option, as the latency is generally large and Netbeans will get on your nerves.
In your project’s settings, you can set the configurations that are relevant to remote development. You can specify what command is executed remotely when Netbeans runs the projects, you can specify a makefile to execute when building the project and also you can specify gdb settings when debugging the project.
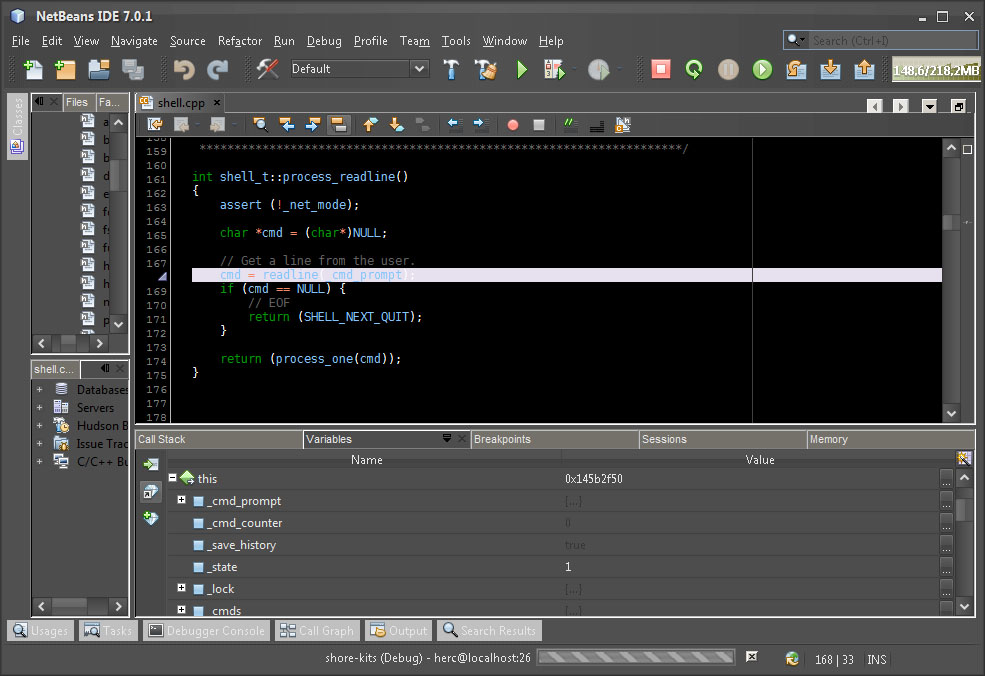
Remote debugging is made easy with Netbeans. It runs gdb on the remote server using SSH, and transfers control to your Netbeans. You can specify breakpoints, investigate variables and the memory, but you can also use the special “Debugger” window where you can immediately interact with gdb using the terminal.
Mercurial
Though Netbeans automatically uploads your files, I thought it was even better to use Mercurial for the exchange of files between my laptop and the server. Because Mercurial is a distributed version-control system (in contrast to Subversion), you don’t have to propagate the changes to other user’s repositories.
Mercurial (and CVS and Subversion) is inherently supported in Netbeans. You can use it to clone your project files from the server into your laptops and then make a new Netbeans C++ project out of them. When you modify them, different colors denote changes and you can easily assign shortcuts to commit changes and push them back to the server.
You can also install TortoiseHg, an excellect graphical Mercurial client that integrates with Windows Explorer.
Changing the looks
Many programmers prefer darker colors when they code as they are more comfortable for the eyes. Netbeans already allows you to change the Editor’s theme and includes pre-configured dark themes. Another nice Editor theme you could try is Sunburst.
But I guess only a dark editor isn’t enough, as the rest of Netbeans is white and that makes too bad of a contrast. You can change Netbean’s look by adjusting the Java Swing “look and feel”, using various applications such as NimROD. A better way is to install the Substance plugin, which already includes several nice dark themes.
Mind the line endings
Unix, Mac OS and Windows unfortunately use different notation for line endings in text files. This can get things quite messy in the server’s code if you’re using Netbeans on Windows. Unfortunately, Netbeans doesn’t support a configuration to set the line endings. When it opens a file, it reads the first line ending it finds and applies the same to the rest of the file. That means that you won’t get Windows line endings in files you copied from Unix, but newly-created files on Windows will contain Windows line endings.
Fortunately, there is a handy plugin that allows you to change the line endings of the whole file inside Netbeans: Show and change line endings. It’s installed in Netbean’s status bar and you can click it to select between Windows (CRLF), Unix (LF) and Mac (CR) line endings.
Executing an external file
Unfortunately, Netbeans doesn’t provide an automatic means of executing an external file. But it provides a rich API one can use to extend the whole of Netbeans. Here is a nice guide that allows you to create a menu and a button (and then you can also assign a shortcut to it through Netbeans), that when clicked will run an external file. If the external file is a script, it’s output will also be shown in Netbean’s Output window.
Leave a comment